Technical guide
Levelling walls before porcelain: what changed, why adhesive is not a levelling compound, and what the substrate has to be
A plain-language guide to wall preparation under large-format porcelain: what turned flatness into a preparation problem rather than a finishing one, how the two families of levelling material differ, why a plane built out of tile adhesive cracks, what has to be true of the substrate before anything goes on it, and what levelling does not fix.
By Mihail Cheptene · 24 August 2026
What actually changed
Expectations of wall flatness have tightened sharply over the past years, and the tolerances in the British Standards have not: BS 5385 was revised in 2018 to bring large-format tiles and panels into its scope, but the flatness figures stayed where they were. Three other things moved.
Light. A deviation that used to go unseen is now revealed by any LED placed close to the surface. An incandescent lamp glows from a filament centimetres across, behind a frosted bulb that spreads it further, so light arrives from many directions, the edge of a shadow is soft, and a small step is lost inside it. An LED glows from a chip measured in millimetres, which is close to a point source and casts a shadow with a hard edge. Set the strip into a shadow gap at the very edge of the wall and the beam runs almost parallel to the surface: at a few degrees of incidence, a one-millimetre ridge throws a shadow ten to twenty millimetres long. A wall that sits inside tolerance looks as though it does not.
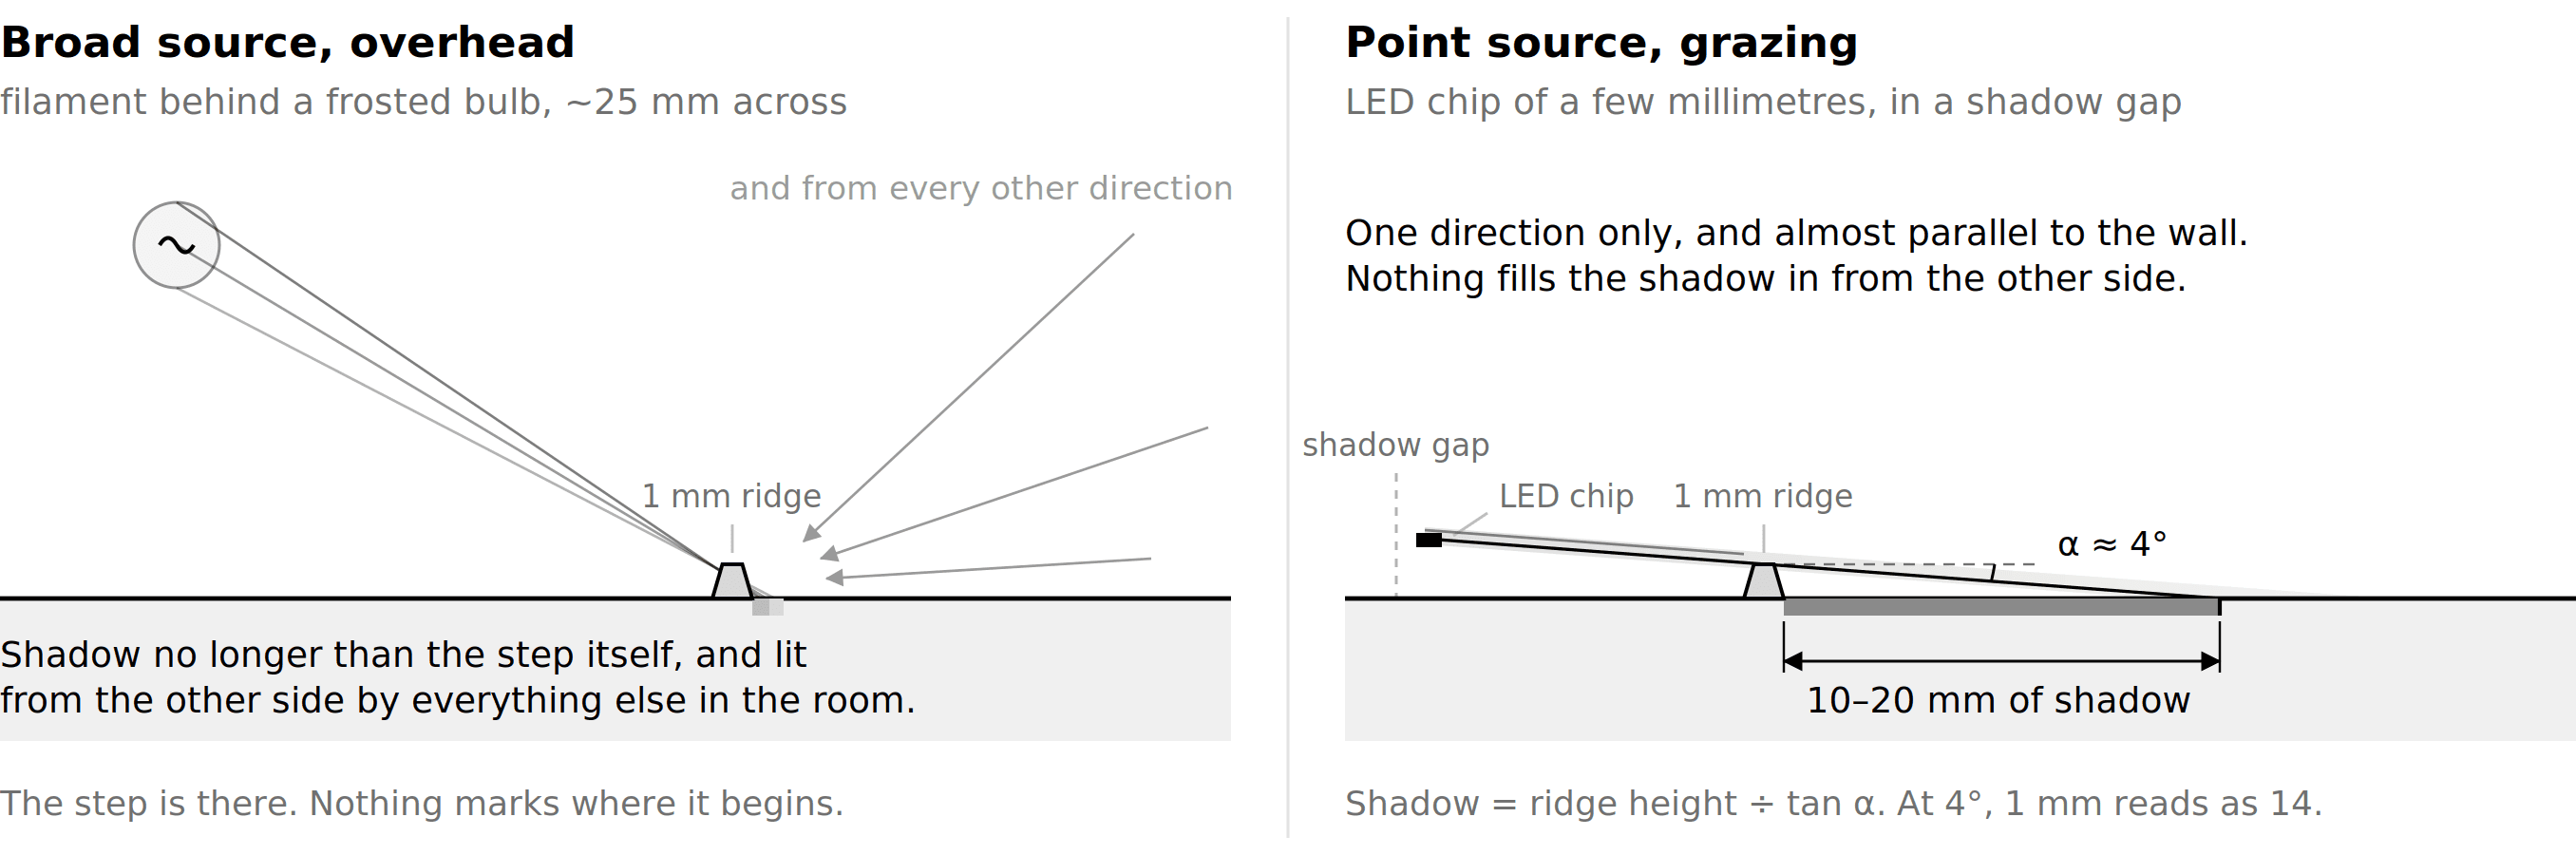
The same one-millimetre ridge under two kinds of light. Overhead, it is lit from the lamp and from every reflecting surface in the room, so the shadow is no longer than the step itself and is filled in from the other side. From a chip set in a shadow gap the light arrives from one direction only, almost parallel to the wall, and the shadow runs to the height of the ridge divided by the tangent of the incidence angle. Schematic; the ridge is drawn at roughly the same scale as the shadow it casts.
Format. A small tile followed the wave. A 150 mm module rides over a gentle undulation and spreads the error across the joints. A large plate cannot do that. Pressing one edge down lifts the other, so the tile stands out of plane with its neighbour, the step shows as lippage, and the joint loses its constant width along its whole length. Of the three, this is the only one that creates the defect rather than exposing one that was already there.
Instrument. A laser level and a two-metre straightedge have stopped being professional rarities. They are used now not only to do the work but to accept it. Flatness left the territory of opinion and became something measured, and the person measuring it can be the client.

A 2.4 metre straightedge held against the wall — the length that is actually on site. The standard states its figure over two metres, and the gap behind the rule takes no skill to find.

A line laser set against the plane. The wall either follows the line or it does not, and the difference reads from across the room.
Two categories of material
Levelling materials divide into two families, and the line between them is not what goes on top. It is whether the layer carries load.
The finishing tier is filler and sprayed plaster under paint — gypsum in the bagged materials, polymer binder in the ready-mixed and airless ones. The layer is a millimetre or two, feathered to nothing at its edges, and the job is accuracy of plane and texture under light. Adhesion here is a condition rather than a design parameter: the layer has to stay on the wall, but nothing loads it, because paint weighs nothing.
The structural tier is cement-based levelling compound under porcelain. The layer is millimetres to centimetres and becomes part of what everything hangs on: the tile is held not by the adhesive but by whatever sits behind it. That brings in figures a filler does not carry at all — adhesion to the substrate, compressive strength, thickness per pass, and time to tiling.
Both were specialist orders not long ago: one supplier, bags, a named project. Both now sit on the shelf at almost any merchant.
Choosing a compound
Narrowed to porcelain and to walls only, the range still looks excessive: there are dozens of products. The problem they solve is one and the same, and what differs is the approach. In practice the choice comes down to two figures — how much thickness has to be built, and how soon the wall has to be ready to tile.
Time carries a subtlety. Setting time and time to tiling are different numbers, and it is the second that governs. Tile earlier than it allows and residual water is sealed under the plate with nowhere left to go. To that add the moisture of the substrate itself where the wall is new: a levelling compound neither dries it nor isolates it.
Shrinkage is worth stating plainly. Every cement-based material shrinks, levelling compound included; the question is whether the shrinkage is controlled. A levelling compound is formulated for a stated range of thickness, and across that range the shrinkage is held low enough that the plane laid is the plane left after the layer gains strength, and pull-off stays at its design figure. Adhesive taken outside its working thickness keeps neither. The additives that give an adhesive its workability raise the proportion of water and polymer in the mix, and with them the shrinkage as the layer hardens — so a plane built out of adhesive usually ends in the layer cracking.

The substrate
The wall is checked before anything goes on it, and the first question is what it is made of.
Gypsum plaster and a cement-based compound are incompatible. Where water is present, ettringite grows at the boundary — a crystal occupying more volume than the substances it came from — and it tears the bond apart from inside. So under porcelain a levelling compound either does not go on gypsum at all, or goes on only through a primer the manufacturer has named for that case.
Then the substrate itself: whether it holds under pull-off, and whether there is any delamination or friable material. If the wall does not hold itself, a levelling compound does not fix that, and the wall is rebuilt another way. Preparation from there is the same as for tile adhesive. Mechanical first: take off the weak layer and open the pores with a diamond cup wheel. Then degrease, remove the dust, prime — in that order, because degreasing before grinding achieves nothing. Why the priming step matters and what belongs on each background is covered in the primer guide.
Once the levelled wall has dried, there is a case for a second pass with a dispersion primer. A dry cement surface pulls water hard and takes it from the adhesive in the first minutes. The primer slows absorption by exactly enough for the adhesive to gain strength at the bond line.
Reinforcement
The same compound can also be used as a render, over mesh. Alkali-resistant mesh is bedded into the fresh layer, nearer its outer third, and covered by a second pass.
It belongs at junctions between different materials, over filled chases, and across large unbroken planes. Without it a crack in the substrate travels straight through the layer and comes out in the tile joint. Worth understanding: the mesh adds nothing to the layer's compressive strength or its bond to the wall, and it does not compensate for a weak substrate. What it does is take up the tensile stress that cement itself cannot hold and spread it, so movement in the substrate does not collect into a single line. Movement of structural order — settlement, a building's expansion joint — is beyond it: that is answered with a joint carried through the tiling, not with mesh.
What levelling does not solve
A levelling compound produces a plane, and its function ends there.
It does not replace the load-bearing capacity of the wall. A wall-hung WC, a basin, a shower screen are carried by the structure behind the compound rather than by the compound itself, and that question is settled before levelling rather than after.
Nor is it waterproofing. The membrane goes over the levelled and dried wall, as the last layer before the adhesive. Levelling on top of the membrane sits outside the system: a cement compound bonding to an elastic membrane is not what either was specified for, the membrane is easily wounded under the tools, and the layer then lives on the wet side of the construction and stays damp for the life of the room. The reverse order appears only in refurbishment, where levelling is laid over existing waterproofing, and that is a separate situation. Where the substrate itself has to be both flat and waterproof from the outset, a board system solves both at once — that is covered in the wedi board guide.
Why it is rarely done
Wall geometry on most projects leaves a good deal to be desired, and the last person to meet it is the tiler. He arrives at the end, works with what he has been left, and is expected to deliver flatness and geometry to BS. The material to hand is adhesive, and the wall gets built out with it.
To be honest about it: most of the time that is enough. In the large majority of cases the wall stands and troubles nobody. The problem is that it is not every time, and where it was not enough, removal becomes a question of when.
The particular difficulty is that the tiler generally never finds out. Debonding arrives years later, the tiles come off for somebody else on another project, and the feedback never reaches the person who did the work. So the habit of building walls out with adhesive, formed on one generation of materials, is carried unexamined onto the next, although the formulations have changed in the meantime, for the reasons above.
A levelling compound produces nothing that is visible on the finished wall. What it removes is the uncertainty: the layer goes on inside the range it was formulated for, and the outcome stops depending on whether this particular project got lucky.
Common questions, straight answers
How flat does a wall have to be for large-format porcelain?
BS 5385 puts it at no more than 3 mm under a two-metre straightedge for thin-bed fixing. That is the acceptance figure. Under an LED strip set close to the surface even a wall inside tolerance can show shadowing, so on a lit feature wall the practical target is tighter than the standard.
Can tile adhesive be used to level a wall?
Inside its stated working thickness, yes — that is part of what it is for. Beyond that thickness the layer shrinks as it hardens, and neither the plane nor the pull-off strength survives; it usually ends in cracking. Thickness beyond the adhesive's range belongs to a levelling compound, which is formulated for it.
Can a cement levelling compound go over gypsum plaster?
Not directly. Where the two meet in the presence of water, ettringite grows at the boundary and breaks the bond from inside. Either the gypsum comes off, or the compound goes on only through a primer its manufacturer has named for exactly that case.
How soon after levelling can tiling start?
The figure that governs is time to tiling on the data sheet, not setting time. Porcelain is effectively vapour-tight: tile early and residual water is sealed behind the plate with nowhere to go. Where the wall itself is new, its own moisture is added to that, and a levelling compound neither dries it nor isolates it.
Does a levelling compound waterproof the wall?
No. The compound produces a plane and nothing else. In a wet zone the membrane goes over the levelled and dried wall, as the last layer before the adhesive. Where the substrate has to be both flat and waterproof from the outset, a board system does both at once.
When does the layer need mesh reinforcement?
At junctions between different materials, over filled chases, and across large unbroken planes. Alkali-resistant mesh takes up tensile stress and spreads it, so a crack in the substrate does not travel through and come out in the tile joint. It does not compensate for a weak substrate, and it does not replace a movement joint.
Will a levelled wall carry a wall-hung WC or a basin?
The compound will not; the structure behind it does. Frames and fixings are settled before levelling, not after.
Is a levelling compound always necessary before porcelain?
No. A wall already inside tolerance is tiled directly. Where it is not, the choice is between building out with adhesive — which stands most of the time but fails unpredictably — and a compound, which removes the uncertainty rather than adding anything visible.
Based on BS 5385 Parts 1 and 2, guidance published by The Tile Association (tiles.org.uk), and the technical data sheets of cement-based levelling compound and adhesive manufacturers. Thickness per pass, time to tiling and substrate compatibility are properties of the specific product: where a manufacturer's data sheet differs from anything set out here, the data sheet has the last word.